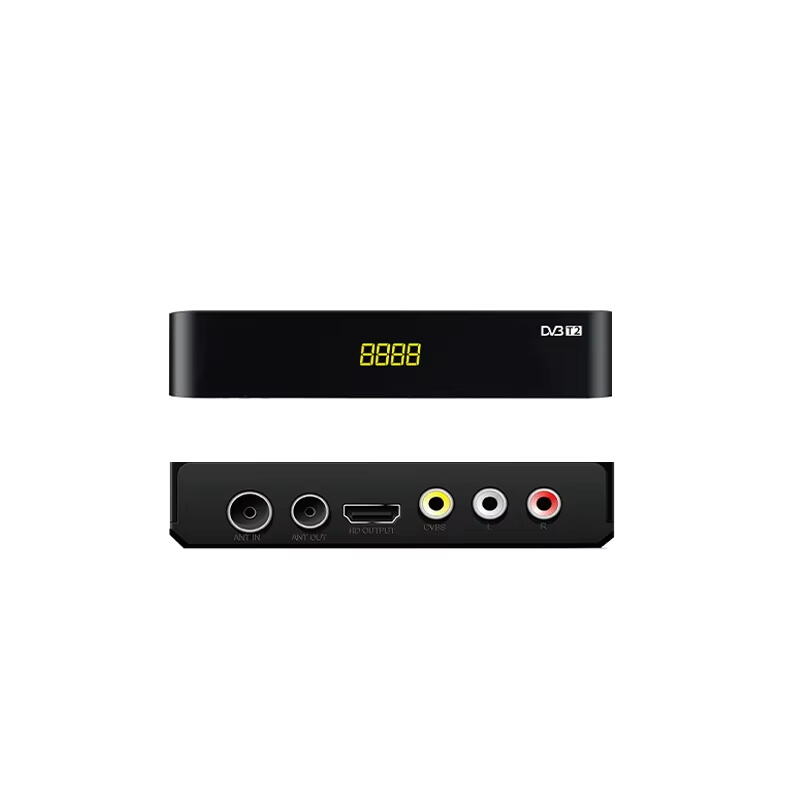
Bist du bereit, kristallklare digitale TV-Kanäle zu genießen? Dieser Leitfaden zeigt dir, wie du einen DVB-T2/C Receiver mühelos installierst. Du musst kein Technikexperte sein, um loszulegen. Der Prozess ist unkompliziert und die Vorteile sind unglaublich. Verabschiede dich von schlechtem Empfang und begrüße hochwertige Unterhaltung in deinem Leben. Startseite !
Hardware-Setup für DVB-T2/C Receiver
Die Einrichtung der Hardware für deinen DVB-T2/C Receiver ist der erste Schritt, um digitale TV-Kanäle zu genießen. Keine Sorge – es ist einfacher, als du denkst! Befolge diese Schritte, um alles zu verbinden und bereit zu machen.
Anschluss des Receivers an den Fernseher
Beginne damit, deinen DVB-T2/C Receiver mit deinem Fernseher zu verbinden. Suche den HDMI-Anschluss auf der Rückseite deines Fernsehers und stecke das HDMI-Kabel ein. Wenn dein Fernseher keinen HDMI-Anschluss hat, verwende stattdessen die AV-Kabel. Passe die Farben der AV-Stecker den entsprechenden Anschlüssen an deinem Fernseher und Receiver an. Sobald alles verbunden ist, schalte deinen Fernseher auf die richtige Eingangsquelle (HDMI oder AV) mit deiner Fernbedienung um.
Anschluss der Antenne oder Kabelanschluss
Als nächstes schließen Sie die Antenne oder den Kabelanschluss an Ihren Receiver an. Für übertragene Kanäle verbinden Sie Ihre Innen- oder Außenantenne mit dem „ANT IN“-Anschluss am Receiver. Wenn Sie eine Kabelverbindung verwenden, stecken Sie das Kabel in denselben Anschluss. Stellen Sie sicher, dass die Verbindung sicher ist, um später Signalprobleme zu vermeiden. Ein loses Kabel kann Unterbrechungen verursachen, also überprüfen Sie es noch einmal, bevor Sie fortfahren.
Einschalten des Receivers
Schließlich schalten Sie Ihren DVB-T2/C-Receiver ein. Stecken Sie das Netzteil in eine Steckdose und verbinden Sie es mit dem Receiver. Drücken Sie die Einschalttaste am Receiver oder verwenden Sie die Fernbedienung, um ihn einzuschalten. Sie sollten den Startbildschirm des Receivers auf Ihrem Fernseher sehen. Wenn nichts erscheint, überprüfen Sie Ihre Verbindungen und die Eingangsquelle erneut. Sobald er eingeschaltet ist, sind Sie bereit, mit der Softwareeinrichtung fortzufahren.
Softwareeinrichtung und -konfiguration
Jetzt, da Ihre Hardware bereit ist, ist es Zeit, die Software zu konfigurieren. Dieser Teil stellt sicher, dass Ihr Empfänger perfekt mit Ihrem Fernseher funktioniert und alle verfügbaren Kanäle liefert. Lassen Sie uns eintauchen!
Zugriff auf das Einstellungsmenü
Beginnen Sie damit, die Fernbedienung Ihres Empfängers zu nehmen. Drücken Sie die „Menü“-Taste, um das Einstellungsmenü auf Ihrem Fernseher zu öffnen. Sie sehen mehrere Optionen wie „Installation“, „Einstellungen“ oder „Setup“. Verwenden Sie die Pfeiltasten, um zu navigieren und die Option „Installation“ oder „Setup“ auszuwählen. Hier konfigurieren Sie Ihren Empfänger für die beste Leistung.
Kanalsuche (DVB-T2)
Wenn Sie eine Antenne verwenden, müssen Sie nach Kanälen suchen. Suchen Sie im Einstellungsmenü nach der Option „Kanalsuche“ oder „Automatische Suche“. Wählen Sie diese aus und wählen Sie „DVB-T2“ als Signaltyp. Der Empfänger sucht nach allen verfügbaren digitalen Kanälen in Ihrer Umgebung. Dieser Prozess kann einige Minuten dauern, also haben Sie Geduld. Sobald es abgeschlossen ist, speichern Sie die Kanalliste.
Konfigurieren von Kabelkanälen (DVB-C)
Für Kabelbenutzer ist der Prozess etwas anders. Wählen Sie im Einstellungsmenü „Kabel“ oder „DVB-C“ als Signaltyp aus. Möglicherweise müssen Sie Details wie Frequenz oder Netzwerk-ID eingeben, die Ihr Kabelanbieter bereitstellen kann. Nachdem Sie die Informationen eingegeben haben, starten Sie den Kanalscan. Speichern Sie die Ergebnisse, sobald der Scan abgeschlossen ist.
Optimierung der Bild- und Audioeinstellungen
Schließlich verfeinern Sie die Bild- und Audioeinstellungen. Gehen Sie zum Menü „Einstellungen“ oder „Präferenzen“. Passen Sie die Auflösung an die Fähigkeiten Ihres Fernsehers an (z. B. 1080p für HD-Fernseher). Wählen Sie für Audio das Ausgabeformat, das am besten mit Ihrem Soundsystem funktioniert. Diese Anpassungen sorgen dafür, dass Sie das beste Seherlebnis und Hörerlebnis erhalten.
Fehlersuche während der Installation
Selbst mit der besten Einrichtung können Sie auf einige Probleme stoßen. Keine Sorge – die meisten Probleme sind leicht zu beheben. Lassen Sie uns die häufigsten Probleme angehen, die Sie bei der Einrichtung Ihres DVB-T2/C-Empfängers haben könnten.
Behebung von Signalproblemen
Sehen Sie eine „Kein Signal“-Meldung? Das bedeutet normalerweise, dass der Empfänger kein richtiges Signal erhält. Überprüfen Sie zunächst die Antenne oder die Kabelverbindung. Stellen Sie sicher, dass sie sicher in den „ANT IN“-Anschluss eingesteckt ist. Wenn Sie eine Antenne verwenden, passen Sie ihre Position an. Platzieren Sie sie in der Nähe eines Fensters oder höher für besseren Empfang. Für Kabelbenutzer bestätigen Sie, dass Ihr Kabeldienst aktiv ist.
Überprüfen Sie als Nächstes, ob Ihr Fernseher auf die richtige Eingangsquelle (HDMI oder AV) eingestellt ist. Wenn das Problem weiterhin besteht, versuchen Sie, den Empfänger neu zu starten. Ziehen Sie ihn für ein paar Sekunden aus der Steckdose und stecken Sie ihn dann wieder ein. Dieser einfache Reset löst oft Signalprobleme.
Fehlende Kanäle beheben
Fehlen nach dem Scannen einige Kanäle? Keine Panik. Führen Sie zuerst den Kanalscan erneut durch. Manchmal überspringt der Empfänger während des ersten Scans Kanäle. Für DVB-T2-Benutzer stellen Sie sicher, dass Ihre Antenne richtig positioniert ist. Schwache Signale können dazu führen, dass Kanäle übersprungen werden.
Wenn Sie DVB-C verwenden, überprüfen Sie die Frequenz- oder Netzwerk-ID-Einstellungen erneut. Diese Details sollten mit den Informationen übereinstimmen, die Ihr Kabelanbieter bereitstellt. Aktualisieren Sie sie bei Bedarf und scannen Sie erneut. Speichern Sie die neue Kanalliste, sobald der Scan abgeschlossen ist.
Sie haben jetzt gelernt, wie man einen DVB-T2/C Receiver installiert und ihn für das beste Fernseherlebnis einrichtet. Vom Anschließen der Hardware bis zum Scannen nach Kanälen bringt Sie jeder Schritt näher daran, hochwertiges digitales Fernsehen zu genießen. Erkunden Sie die Kanäle und nutzen Sie Ihr neues Setup optimal. Wenn Sie auf ungelöste Probleme stoßen, überprüfen Sie das Benutzerhandbuch oder kontaktieren Sie den Support um Hilfe. Viel Spaß beim Anschauen!


